PAT Enterprise Service Installation: Unterschied zwischen den Versionen
(→IIS Data Folder) |
(→IIS Data Folder) |
||
| (5 dazwischenliegende Versionen desselben Benutzers werden nicht angezeigt) | |||
| Zeile 149: | Zeile 149: | ||
4. Add | 4. Add | ||
| − | 5. Insert IIS AppPool\ Enterprise Service | + | 5. Insert <code>IIS AppPool\PAT Enterprise Service</code> |
| + | '''Ab Version 24.109: <code>IIS AppPool\PAT Hub</code>''' | ||
6. Name | 6. Name | ||
| Zeile 164: | Zeile 165: | ||
== Testing of the Server Side part using Browser == | == Testing of the Server Side part using Browser == | ||
[[File:Enterprise_Install_14.png|border|left|600px]] | [[File:Enterprise_Install_14.png|border|left|600px]] | ||
| − | http:// | + | http://localhost:8080/api/test |
Tests the connection string and the webservices, in our case the connection string does work fine. In some case there could be an error 5xx or 4.03. | Tests the connection string and the webservices, in our case the connection string does work fine. In some case there could be an error 5xx or 4.03. | ||
| Zeile 177: | Zeile 178: | ||
<br clear=all> | <br clear=all> | ||
| − | [[File:Enterprise_Install_16.png|border|left| | + | [[File:Enterprise_Install_16.png|border|left|500px]] |
The steps which are explained for the server-side installation are now done by now your folder structure should look similar to the folder structure beside. | The steps which are explained for the server-side installation are now done by now your folder structure should look similar to the folder structure beside. | ||
So inside there are PAT Enterprise Folder (bin, data, admin, global.aspx, packages and web config file) as well our default.config which depends on the environment of our installation as well our data folder which define the time span and delay time for our Session Id. | So inside there are PAT Enterprise Folder (bin, data, admin, global.aspx, packages and web config file) as well our default.config which depends on the environment of our installation as well our data folder which define the time span and delay time for our Session Id. | ||
<br clear=all> | <br clear=all> | ||
Aktuelle Version vom 18. September 2024, 13:58 Uhr
For a clean server side installation the next steps are required:
- Installation of the IIS (Internet Information System) using Windows
- ISS Components
- ASP.net „REGIIS“ (if it is required)
- Create a new IIS Site
- Create Port and Port release
- Default.config configuration
- Testing the Webservices and Database Connection
- Data Folder for saving the Session Id (delay time span and erase minutes count)
Inhaltsverzeichnis
1 Installation of the Internet Information System (IIS)
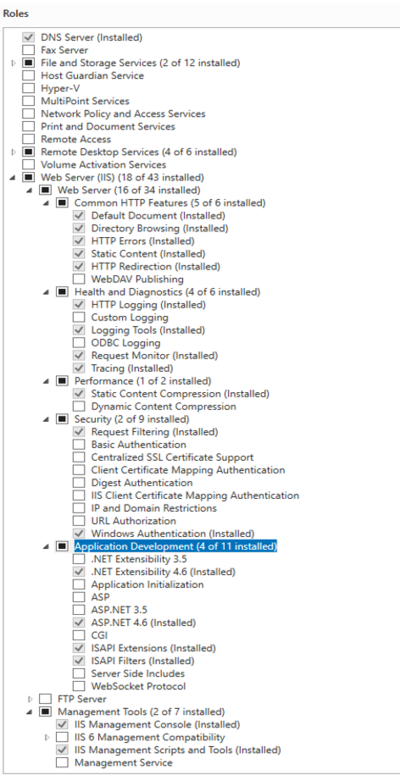
As usually, an installation of the PAT Enterprise starts on the Server Side. ISS is a Windows Feature, which by default is not installed. Under Programs and Features choose Turn Windows feature on or off a new Window appears. It is important to check the following Services and Add-ons:
Common HTTP Features
- HTTP-Errors
- HTTP-Redirection
- Default Document
- Static Content
- Directory Browsing
Health and Diagnostics
- Request Monitoring
- HTTP-Logging
Performance
- Static Content Compression
Security
- Request Filtering
Application Development
- .NET-Extensibility 4.6
- ASP.NET
- ISAPI-Extensions
- ISAPI-Filters
Management Tools
- IIS-Management Console
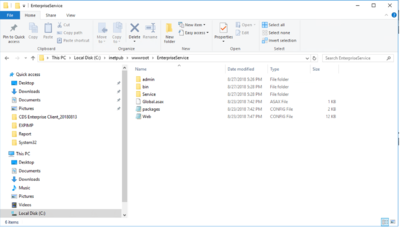
After a successfully installation of the Inter Information System (IIS) copy the folder with the Service files in the Folder Destination of your new installed IIS.
C:\inetpub\wwwroot\EnterpriseService
After that rename the Folder to Enterprise Service which is more readable and effective for further changes. A comprehensible name makes it easy to define the software and it is more effective if there are more developer include in a project.
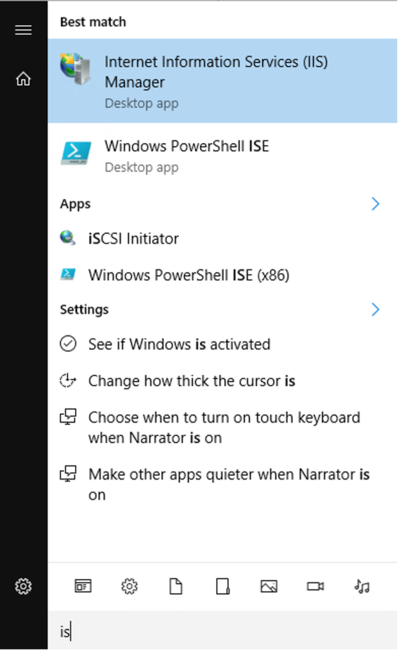
IIS is now available under Start / Program
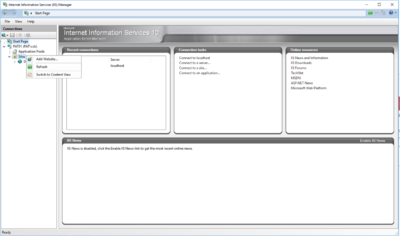
Create a new website which is used as new base for our Server Side PAT Enterprise, on right click “Add Website” we add our new Service.
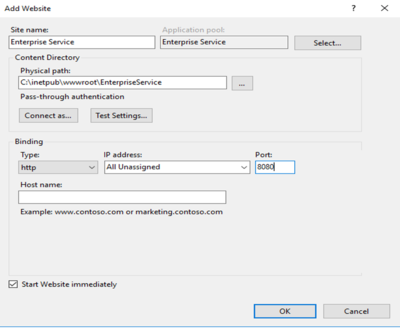
As usual we are using default settings, it’s important to include all needed settings which are:
- Sitename: Name of your Application (Enterprise Service)
- Physical Path: path of your folder (C:\inetpub\wwwroot\EnterpriseService “see picture below”)
- Port: port number (it depends on the environment in our case we are using 8080, in some cases 8080 is used somewhere else so use a port number which are not used at the time).
- IP-Address: All Unassigned as Default
2 ASP.NET REGIIS (optional)
The ASP.NET IIS Registration tool (Aspnet_regiis.exe) is used to register ASP.NET application with Internet Information Services (IIS). Asp.Net Regiis can be installed with CMD (should be start as Admin). Using CMD we insert the next code line which will bring us to the folder where we will install Asp.Net Regiis as in the example below:
Cd C:\Windows\Microsoft.NET\Framework\v4.0.30319
After that we add the command
C:\Windows\Microsoft.NET\Framework\v4.0.30319 > Aspnet_regiis –ir
And the Asp.NET Regiis will be installed properly.
3 Application Pools
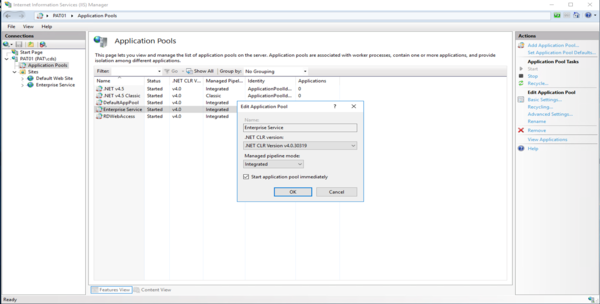
After Installation of the IIS, adding the Folder, define settings for our Server Side Application we add in Application Pools and set the the NET Framework Version to the last one all from 4.x should be considered, and the Managed pipline mode: to “Integrated”.
In some case like using the Windows Server 2012 it is necessary to add the Feature in our case it’s the HTTP Activation Feature from the Add Roles and Features Wizard.
4 Setup the Idle Time-out and Specific Times in the TimeSpan[]Array
The next step explains the time span and the time when the memory will where the session Id is saved will be erased. There are two steps specific time and the minutes.
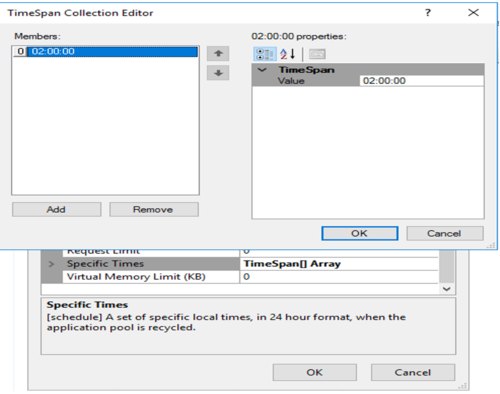
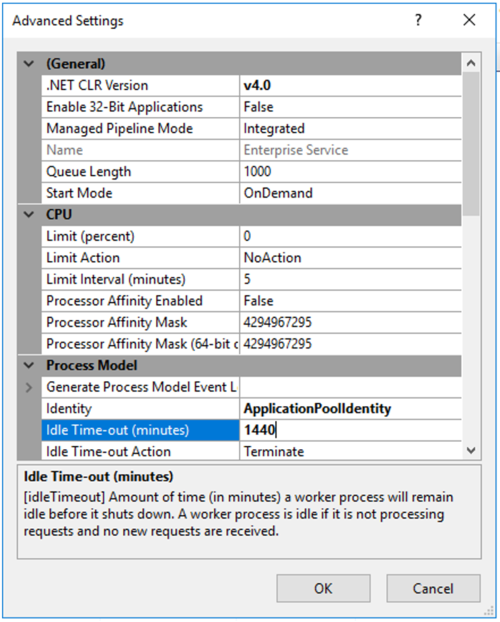
Rick Click in the Application Pools => Advanced Settings
In our case we setup the time span to under Specific Times and new Member and set the value to 02:00.00.
Next we setup the minutes which count the time for the process. Under Idle Time-out (minutes) we add 1440 which indicate that after 1440 minutes the memory will be delated and reset.
5 Windows-Firewall with Advanced Security
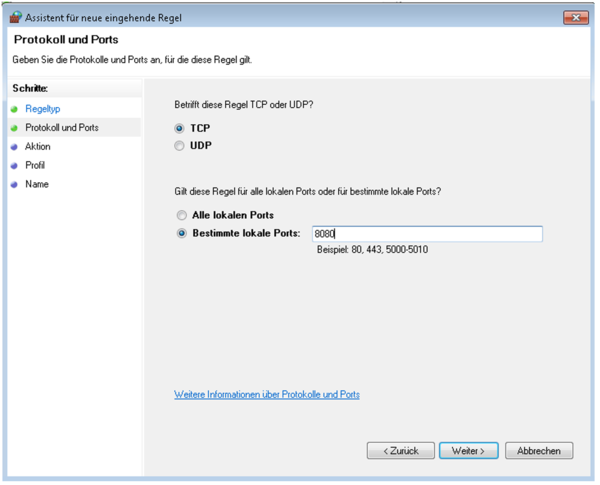
Inbound Rules: New Rule
Regeltyp: Port
Protocol und Ports: TCP and 8080
Action: Default
Profil: Default
Name: PAT Enterprise
6 Default.config
Default.config allows us to define our connection string which is our Host IP Address (192.168.0.227 ) and the Connection Data Source (as in our example it’s the PATDB11). After changing the default name to default.config and the settings safe the file in the same folder as it used to be.
- <?xml version="1.0" encoding="utf-8"?>
- <configuration>
- <configSections>
- <section name="log4net"
- <configSections>
- type="log4net.Config.Log4NetConfigurationSectionHandler, log4net"/>
- </configSections>
- <connectionStrings>
- <add name="DefaultConnection" connectionString="Data
- Source=(DESCRIPTION=(ADDRESS=(PROTOCOL=TCP)(HOST=192.168.0.227)(PORT=1521))(CONNECT_DATA=(SID=PATDB11)));User Id=PAT;Password=PAT;"
- providerName="CDS.Enterprise.Database"/>
- </connectionStrings>
7 IIS Data Folder
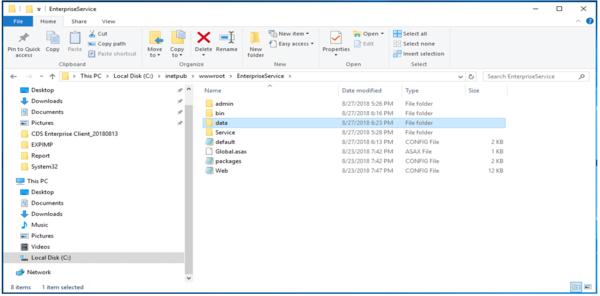
In the IIS Folder Path create a new Folder and set the name like in the picture “data”.
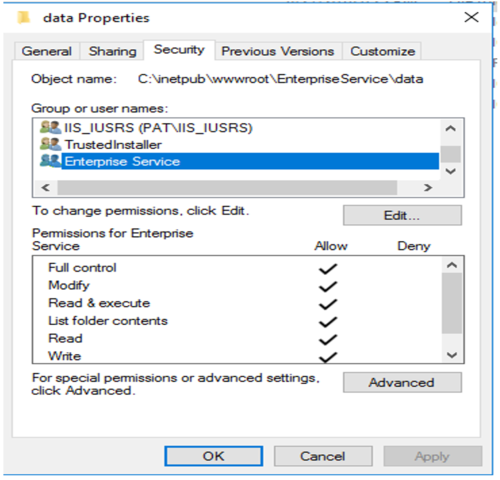
As next step we have to add the permission for the folder “data”
1. Right Click on the Folder => Properties
2. Security
3. To change permission, click Edit => Edit
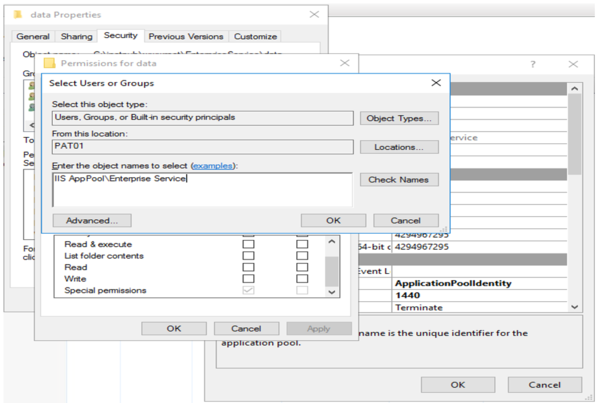
4. Add
5. Insert IIS AppPool\PAT Enterprise Service
Ab Version 24.109: IIS AppPool\PAT Hub
6. Name
It is important the Service Name should be the same which is define in the Application Pools.
After adding the full control to our data Properties Folder we should considering and define that after adding the permission we have to add the permission to our Local User not to the Domain, after a successful add of the permission now the Session Id will be set and after the delay time of 1440 min the file under data will be reset and erased.
8 Testing of the Server Side part using Browser
http://localhost:8080/api/test
Tests the connection string and the webservices, in our case the connection string does work fine. In some case there could be an error 5xx or 4.03.
Solution for 5xx Error install the optional needed Asp.NET Regiis which was explained before in the chapter, as well 4.03 define the version of the Framework which has to be 4+ which was also explained in a chapter before.
http://localhost:8080/api/test/database
Database Error the developer should open the config files and analyses the connection string to the Database which should solve the problem.
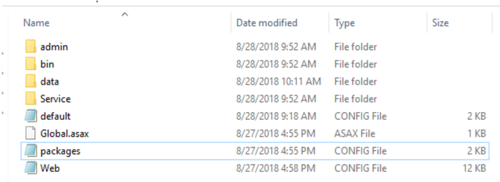
The steps which are explained for the server-side installation are now done by now your folder structure should look similar to the folder structure beside.
So inside there are PAT Enterprise Folder (bin, data, admin, global.aspx, packages and web config file) as well our default.config which depends on the environment of our installation as well our data folder which define the time span and delay time for our Session Id.
