Psenner Webportal manual: Unterschied zwischen den Versionen
(→Statistiken im Agentur-Login) |
K (→in Excel) |
||
| (29 dazwischenliegende Versionen desselben Benutzers werden nicht angezeigt) | |||
| Zeile 12: | Zeile 12: | ||
== First overview == | == First overview == | ||
| − | [[File: | + | [[File:Psenner_Webportal_01EN_n1.png|border|left|600px]] |
When you have registered and signed in the availabilities of delivery forms we offer will open. Furthermore you will find an overview <span style=color:red;">(6)</span> which leads to all your events and orders. | When you have registered and signed in the availabilities of delivery forms we offer will open. Furthermore you will find an overview <span style=color:red;">(6)</span> which leads to all your events and orders. | ||
| − | In <span style=color:red;">(1)</span> you are signed in with your name. | + | In <span style=color:red;">(1)</span> you are signed in with your name. A click on the arrow leads to the links which are also shown in the overview <span style=color:red;">(6)</span>. |
At <span style=color:red;">(2)</span> you can logout. | At <span style=color:red;">(2)</span> you can logout. | ||
| Zeile 24: | Zeile 24: | ||
The Icon "Home" <span style=color:red;">(8)</span> leads to the Psenner homepage. | The Icon "Home" <span style=color:red;">(8)</span> leads to the Psenner homepage. | ||
| − | |||
| − | |||
<br clear=all> | <br clear=all> | ||
| Zeile 31: | Zeile 29: | ||
[[File:Psenner_Webportal_02nen.png|border|left|600px]] | [[File:Psenner_Webportal_02nen.png|border|left|600px]] | ||
| − | You can restrict "crop" | + | You can restrict "crop" in the selected delivery form <span style=color:red;">(1)</span> in the lookup field by choosing one special <span style=color:red;">(2)</span>. |
To simplify your choice we have built in a search function which restricts to part of words. | To simplify your choice we have built in a search function which restricts to part of words. | ||
| Zeile 105: | Zeile 103: | ||
At the log hint <span style=color:red;">(1)</span> you will come to "orders". In this table will be shown the actual orders. | At the log hint <span style=color:red;">(1)</span> you will come to "orders". In this table will be shown the actual orders. | ||
| − | By clicking "show order" <span style=color:red;">(2)</span> you can open the specific order. By clicking at "change" <span style=color:red;">(4)</span> a confirmed order | + | By clicking "show order" <span style=color:red;">(2)</span> you can open the specific order. By clicking at "change" <span style=color:red;">(4)</span> a confirmed order can be changed until start of production (as described below). |
| Zeile 131: | Zeile 129: | ||
=== change order === | === change order === | ||
| − | It is possible to change an order if it is in the status <code>approved</code> or <code>planned on tour</code>. By clicking | + | It is possible to change an order if it is in the status <code>approved</code> or <code>planned on tour</code>. By clicking on <code>change</code> a new masque will open where changes in the quantity could be written or surplus articles could be added. |
[[File:Psenner_Webportal_18EN.png|border|left|600px]] | [[File:Psenner_Webportal_18EN.png|border|left|600px]] | ||
| − | The articles of the order called up will be displayed with their availability and the ordered quantities after clicking | + | The articles of the order called up will be displayed with their availability and the ordered quantities after clicking on "change". |
By hooking <code>Add new articles</code> <span style=color:red;">(1)</span> there will open a list with new introduced articles of this year. Combined with <code>Show only available items</code> <span style=color:red;">(2)</span> this list will be reduced to the articles available in the delivery week. | By hooking <code>Add new articles</code> <span style=color:red;">(1)</span> there will open a list with new introduced articles of this year. Combined with <code>Show only available items</code> <span style=color:red;">(2)</span> this list will be reduced to the articles available in the delivery week. | ||
In the input fields of the quantity <span style=color:red;">(3)</span> the number can be changed. | In the input fields of the quantity <span style=color:red;">(3)</span> the number can be changed. | ||
| − | If the status of this order already is <code>planned on tour</code> the quantity only can be increased. It is possible to reduce or delete an article before | + | If the status of this order already is <code>planned on tour</code> the quantity only can be increased. It is possible to reduce or delete an article only before. |
By clicking the button >>Add article<< <span style=color:red;">(4)</span> more articles and other assortments can be selected and added to the order. | By clicking the button >>Add article<< <span style=color:red;">(4)</span> more articles and other assortments can be selected and added to the order. | ||
| − | If a change shall be fixed please click | + | If a change shall be fixed please click on >>send change<< <span style=color:red;">(5)</span> to confirm and send. |
If there shall be no change you have to click the button >>Cancel<< to end this procedure properly. | If there shall be no change you have to click the button >>Cancel<< to end this procedure properly. | ||
<br clear=all> | <br clear=all> | ||
[[File:Psenner_Webportal_19EN.png|border|left|600px]] | [[File:Psenner_Webportal_19EN.png|border|left|600px]] | ||
| − | The masque "Add article" is similar to the assortment masque. Again you first reduce the selection to particular items or groups <span style=color:red;">(1)</span>. | + | The masque "Add article" is similar to the assortment masque. Again you can first reduce the selection to particular items or groups <span style=color:red;">(1)</span>. |
| − | In the input fields <span style=color:red;">(2)</span> the | + | In the input fields <span style=color:red;">(2)</span> the required quantity can be written. The entered quantities will be added to the order by clicking the button >>Add article<< <span style=color:red;">(3)</span>. |
It is possible to leave this masque without any changes by clicking the cross top right <span style=color:red;">(4)</span>. | It is possible to leave this masque without any changes by clicking the cross top right <span style=color:red;">(4)</span>. | ||
| Zeile 157: | Zeile 155: | ||
=== Renew order === | === Renew order === | ||
[[File:Psenner_Webportal_17EN.png|border|left|600px]] | [[File:Psenner_Webportal_17EN.png|border|left|600px]] | ||
| − | With the selection "Renew order" it is possible to recall orders and order again for | + | With the selection "Renew order" it is possible to recall orders and order again for the next season. |
| − | In the red framed fields the assortment can be chosen and the period | + | In the red framed fields the assortment can be chosen and the period can be restricted from a standard period of three years. With a click on >>show order<< <span style=color:red;">(1)</span> the concluded orders of this selection will be displayed. You will find the then-delivery week <span style=color:red;">(2)</span> and then-total quantity <span style=color:red;">(3)</span>. |
In the details <span style=color:red;">(4)</span> the order can be displayed (see above). | In the details <span style=color:red;">(4)</span> the order can be displayed (see above). | ||
| − | In the selection field <code>Update delivery week</code> <span style=color:red;">(5)</span> the new delivery week can be postponed | + | In the selection field <code>Update delivery week</code> <span style=color:red;">(5)</span> the new delivery week can be postponed to or fro for two weeks. If this order shall be used for the next season it has to be hooked at <code>Renew</code> <span style=color:red;">(6)</span>. |
| − | The orders selected | + | The orders selected this way can be called up again with clicking on >>Renew<< <span style=color:red;">(7)</span>. |
<br clear=all> | <br clear=all> | ||
[[File:Psenner_Webportal_16EN.png|border|left|600px]] | [[File:Psenner_Webportal_16EN.png|border|left|600px]] | ||
| − | Now each article will be displayed for the selected week <span style=color:red;">(1)</span> and the then ordered quantity <span style=color:red;">(2)</span>. | + | Now each article will be displayed for the selected week <span style=color:red;">(1)</span> and the then-ordered quantity <span style=color:red;">(2)</span>. |
Here again colours of availability are relevant. The red marked article actually is not available for this period. | Here again colours of availability are relevant. The red marked article actually is not available for this period. | ||
| − | With the button >>Add article<< <span style=color:red;">(3)</span> you | + | With the button >>Add article<< <span style=color:red;">(3)</span> you enter the masque "assortment" again and can select surplus articles. |
| − | At >>delete<< <span style=color:red;">(4)</span> the new order will be | + | |
| − | '''If | + | At >>delete<< <span style=color:red;">(4)</span> the new order will be cancelled. You can start again after doing so. |
| + | '''If an existing order is displayed in "Renew order" at the beginning, please first click the button >>delete<< <span style=color:red;">(4)</span>!''' An ordering process of before has not been finished. | ||
With >>add to cart<< <span style=color:red;">(5)</span> the selected articles will be taken to the <u>[[Psenner_Webportal_manual#The_shopping_cart|shopping cart]]</u>. | With >>add to cart<< <span style=color:red;">(5)</span> the selected articles will be taken to the <u>[[Psenner_Webportal_manual#The_shopping_cart|shopping cart]]</u>. | ||
<br clear=all> | <br clear=all> | ||
| − | + | == Invoices == | |
| + | [[File:Psenner_Webportal_10en.png|border|left|600px]] | ||
| + | With selecting "Invoices" your invoices will be shown in a table. | ||
| + | |||
| + | Again in this table you can sort by invoice number or date <span style=color:red;">(1)</span>, use the search <span style=color:red;">(2)</span> or [[Psenner_Webportal_manual#Exporting_the_data_files|export]] <span style=color:red;">(5)</span> this table. | ||
| + | In column "status" <span style=color:red;">(3)</span> you will find out if the respective invoice is payed already or is open or if the payment date is exceeded already (not payed). | ||
| + | |||
| + | If you cannot find an invoice in your documents you can download it with clicking the pdf-logo <span style=color:red;">(4)</span> and save it. | ||
<br clear=all> | <br clear=all> | ||
| Zeile 186: | Zeile 192: | ||
=== Statistics in the customers login === | === Statistics in the customers login === | ||
| − | [[File: | + | [[File:Psenner_Webportal_20EN_1.png|border|left|600px]] |
| − | In "Statistics" different requests could be done and taken for further decisions. | + | In "Statistics" different requests could be done and taken for further decisions. Selecting the title <span style=color:red;">(1)</span> takes you to the corresponding screen. |
| + | |||
| + | All statistics can be created in different formats or exported to Excel. | ||
| + | <br clear=all> | ||
| + | |||
| + | ==== orders per customer ==== | ||
| + | [[File:Psenner_Webportal_23EN.png|border|left|600px]] | ||
| + | In "orders per customer" only the framed fields will be shown first. A selection up to three years back (year 1) and to the following year (year 2) will be possible. It can be set via the lookup-fields <span style=color:red;">(1)</span>. After clicking on >>Show<< <span style=color:red;">(2)</span> the orders will be displayed. | ||
| + | |||
| + | In the headline of each order you will find delivery week <span style=color:red;">(3)</span> and order number <span style=color:red;">(4)</span>. | ||
| + | |||
| + | In each information you will find article specification as well as quantity <span style=color:red;">(5)</span>, price <span style=color:red;">(6)</span> and a possible license fee <span style=color:red;">(7)</span>. | ||
| + | |||
| + | With this statistic, our agent can quickly print out the orders of clients he wants to visit next week. | ||
<br clear=all> | <br clear=all> | ||
==== order statistics ==== | ==== order statistics ==== | ||
[[File:Psenner_Webportal_21EN.png|border|left|600px]] | [[File:Psenner_Webportal_21EN.png|border|left|600px]] | ||
| − | In "order statistics" first the filters | + | In the "order statistics" you can first set the same filters as in the order masque <span style=color:red;">(1)</span> in order to have a pre-selection. |
Then the time space can be reduced to one or more periods<span style=color:red;">(2)</span>. | Then the time space can be reduced to one or more periods<span style=color:red;">(2)</span>. | ||
| − | If there are selected | + | If there are selected several time periods, the parameters selected in "total" will be displayed as account1, account2. |
| − | In "grouping" <span style=color:red;">(3)</span> | + | In "grouping" <span style=color:red;">(3)</span> you can chose several groupings according to your needs. |
| − | *chose <code>delivery year+week</code> if you select | + | *chose <code>delivery year+week</code> if you select a period lasting longer than one year. |
**Example: time1 from 1/19 to 52/20 | **Example: time1 from 1/19 to 52/20 | ||
| − | **the result will be a separate | + | **the result will be a separate line for each year |
| − | *chose <code>shipping week</code> if | + | *chose <code>shipping week</code> if you entered more than one period. |
**Example: time1 from 1/19 to 52/19, time2 from 1/20 to 52/20 | **Example: time1 from 1/19 to 52/19, time2 from 1/20 to 52/20 | ||
**the week will be set in both columns. | **the week will be set in both columns. | ||
| Zeile 207: | Zeile 226: | ||
Selection in "total" <span style=color:red;">(4)</span> will be displayed as a result column for the selected periods. | Selection in "total" <span style=color:red;">(4)</span> will be displayed as a result column for the selected periods. | ||
| − | By clicking >>show<< <span style=color:red;">(5)</span> the corresponding | + | By clicking >>show<< <span style=color:red;">(5)</span> the corresponding chart will be displayed. |
<br clear=all> | <br clear=all> | ||
[[File:Psenner_Webportal_22EN.png|border|left|600px]] | [[File:Psenner_Webportal_22EN.png|border|left|600px]] | ||
| − | In the called up statistic | + | In the called up statistic, the selected groupings (marked in yellow) will be displayed first, then the fields of the totals in the selected periods (green). |
| − | In the result | + | In the result, you can additionally search for certain articles <span style=color:red;">(1)</span>. Furthermore, you can assort the columns in the sequence you prefer by clicking the sort icon <span style=color:red;">(2)</span>. |
| − | You will come back to the selection masque by clicking | + | You will come back to the selection masque by clicking on "Settings" <span style=color:red;">(3)</span> . |
| − | |||
| − | |||
| − | |||
| − | |||
| − | |||
| − | |||
| − | |||
| − | |||
| − | |||
| − | |||
| − | |||
<br clear=all> | <br clear=all> | ||
=== Statistics in the agency login === | === Statistics in the agency login === | ||
| − | [[File: | + | [[File:Psenner_Webportal_24EN_1.png|border|left]] |
| − | Salesmen who are logged in as agents in addition to the above | + | Salesmen who are logged in as agents, in addition to the described above statistics (marked in green here) can call up further overviews which will be described as follows. |
| − | All statistics can be printed directly for a paper use at the visit or saved as PDF or | + | All statistics can be printed directly for a paper use at the visit or saved as PDF or for Excel export. |
<br clear=all> | <br clear=all> | ||
| − | ==== Orders to | + | ==== Orders to be delivered ==== |
[[File:Psenner_Webportal_25EN.png|border|left|600px]] | [[File:Psenner_Webportal_25EN.png|border|left|600px]] | ||
| − | You can call orders set to be delivered via "orders to | + | You can call orders set to be delivered via "orders to be delivered". |
A pre selection can be done by sorting for delivery week or postcode <span style=color:red;">(1)</span> or directly in the search field by reducing the postcode to a region <span style=color:red;">(2)</span>. | A pre selection can be done by sorting for delivery week or postcode <span style=color:red;">(1)</span> or directly in the search field by reducing the postcode to a region <span style=color:red;">(2)</span>. | ||
| − | This way clients could be contacted afterwards to ask if they are satisfied. | + | This way clients could be contacted afterwards to ask if they are satisfied. Doing so, you may possibly get a surplus order. |
<br clear=all> | <br clear=all> | ||
| − | ==== | + | ==== Inactive customers ==== |
[[File:Psenner_Webportal_26EN.png|border|left|600px]] | [[File:Psenner_Webportal_26EN.png|border|left|600px]] | ||
| − | + | Through the statistic "Inactive customers" you can start a pointing search for contact details of customers who did not order for a longer period. | |
| − | + | The search field <span style=color:red;">(1)</span> could be a helpful tool therefor. | |
<br clear=all> | <br clear=all> | ||
| − | ==== | + | ==== Inactive customers with orders ==== |
[[File:Psenner_Webportal_27EN.png|border|left|600px]] | [[File:Psenner_Webportal_27EN.png|border|left|600px]] | ||
| − | + | Sometimes it happens that a customer is set inactive, although there is an open order. In this statistic you can check if the order possibly has to be cancelled. Potentially the customer has to be set active again. | |
| − | + | You get all relevant information from displayed customer number <span style=color:red;">(1)</span> and confirmation number <span style=color:red;">(2)</span>. | |
<br clear=all> | <br clear=all> | ||
| − | ==== | + | ==== processes not completed ==== |
| − | [[File: | + | [[File:Psenner_Webportal_28EN_1.png|border|left|600px]] |
| − | + | Using "processes not completed" helps to reduce data waste. In column "Erstellt von" <span style=color:red;">(1)</span> you will find out if the customer himself or the responsible agent did not complete the order. | |
| − | In " | + | In "process" <span style=color:red;">(2)</span> you can see that the customer thought to change an existing order. At the end he decided against it but did not cancel this action correctly. |
| − | In | + | In "details" it is possible to open this process again with <code>show order</code> <span style=color:red;">(3)</span>. |
<br clear=all> | <br clear=all> | ||
[[File:Psenner_Webportal_29EN.png|border|left|600px]] | [[File:Psenner_Webportal_29EN.png|border|left|600px]] | ||
| − | + | If more than one day has passed, this process cannot be continued. To end it, you can only click on >>delete<< <span style=color:red;">(1)</span>. | |
| − | |||
| − | |||
| − | |||
| − | |||
| − | |||
| − | |||
| − | |||
| − | |||
| − | |||
| − | |||
| − | |||
| − | |||
<br clear=all> | <br clear=all> | ||
| Zeile 323: | Zeile 319: | ||
[[File:Psenner_Webportal_14en.png|border|left|300px]] | [[File:Psenner_Webportal_14en.png|border|left|300px]] | ||
| − | With the >>Excel<< button <span style=color:red;">(1)</span> a similar window like for the PDF one opens. When you confirm with | + | With the >>Excel<< button <span style=color:red;">(1)</span> a similar window like for the PDF one opens. When you confirm with >>OK<< <span style=color:red;">(2)</span>, an Excel file opens where all dates are transfered in. |
You have to give the files free to edit the dates. | You have to give the files free to edit the dates. | ||
Aktuelle Version vom 28. Juni 2023, 11:00 Uhr
Welcome as a user of the Psenner-Webshop.
Beside informations to orders and deliveries it is possible to show actual availabilities weekly.
Furthermore you can fill in orders directly and send to us or you can change existing orders.
With this brief education we will explain the "how to" to you step by step.
Inhaltsverzeichnis
1 First overview
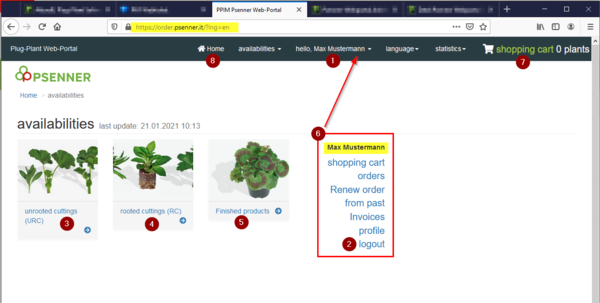
When you have registered and signed in the availabilities of delivery forms we offer will open. Furthermore you will find an overview (6) which leads to all your events and orders.
In (1) you are signed in with your name. A click on the arrow leads to the links which are also shown in the overview (6).
At (2) you can logout.
At (3) to (5) are named the kinds of delivery forms. The unrooted cuttings are in the prefix.
When you have made your orders you go to the shopping cart (7).
The Icon "Home" (8) leads to the Psenner homepage.
2 Availability
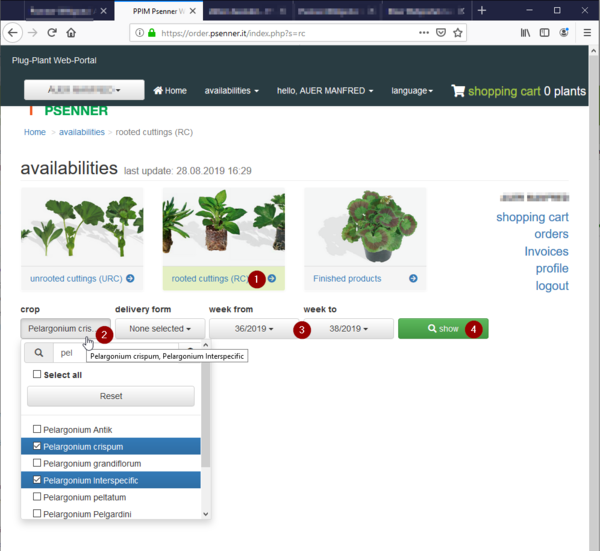
You can restrict "crop" in the selected delivery form (1) in the lookup field by choosing one special (2).
To simplify your choice we have built in a search function which restricts to part of words.
In the shown sample there are only "Pelargonium" with "pel".
In the fields "week from" and "week to" (3) the actual and next following weeks are prefixed. You can select them (until the following year).
For our next sample we have chosen a specific time space for Pel. interspecific.
With a click at >>show<< (4) a table corresponding to your selections will be shown.
2.1 table of selection
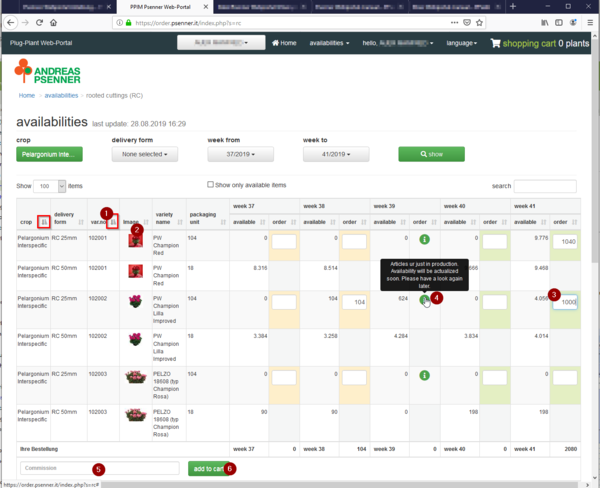
Now for each week you get an overview of the available quantities corresponding to your selection.
In this table you have the possibility to sort each column by using the (red framed here) sort-images (1) that you can find your wanted selection faster.
The column "delivery form" shows the offered sales form, in "packaging unit" you see the delivery quantity quaranteed by us.
The image-icon (2) opens a larger picture of the variety in this row.
In this table you can fill in your orders directly (3).
Please remark that orders are only possible for a multiple of the packaging form. Your input will be rounded automatically.
If you put in more than maximum available there will open a warning hint and the maximum quantity will be inserted.
In one of the weeks there is no insert field. Here you find an information button (4) which opens a hint when scrolled at:
"Articles are just in production. Availability will be actualized soon. Please have a look again later."
This button can move depending to the cultivation time of the artikcle.
If you want you can fill in a commission (5). For finishing your order please click the button >>add to cart<< (6).
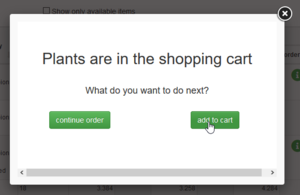
After clicking >>add to cart<< the articles will be transfered. A message opens that transfer was successful. It is combined with the question how to go on: order some more or go to the shopping cart?
In this sample we cklick >>to shopping cart<<.
2.2 The shopping cart
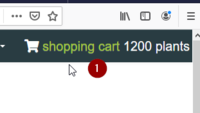
Now please click on the symbol "shopping cart" (1) top right. The quantity of your ordered plants will be shown on the right.
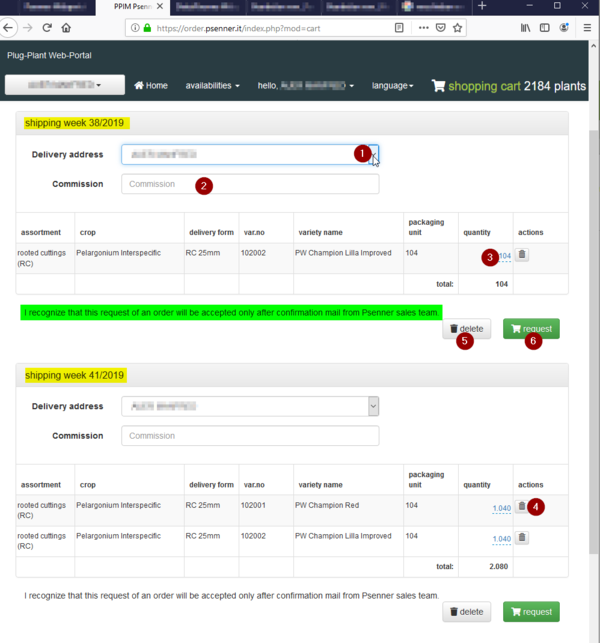
In the shopping cart every delivery week is shown separately. (marked in yellow).
If we have different delivery addresses of your company you can choose the one you want here (1).
Here as well you can write a special text for commission (2).
You can change the quantity of an article still in the shopping cart (3). Therefore another window opens. Please remark that the quantity will be rounded to the next packaging unit.
With click on the "waste bin" (4) an article can be deleted from a delivery week.
By clicking the >>Delete<<-button (5) all rows will be deleted from a delivery week.
Now you can click at >>request<< to send it.
This will be send via email directly to Gartenbau Psenner.
Please remark the hint below each delivery week that you only send a request. This request has to be confirmed from Psenner.
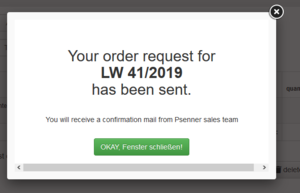
Now a window opens with the hint "Your order request for delivery week XY/YEAR has been sent." Again the hint that you will receive a confirmation mail. You can close the window by clicking the button.
3 orders
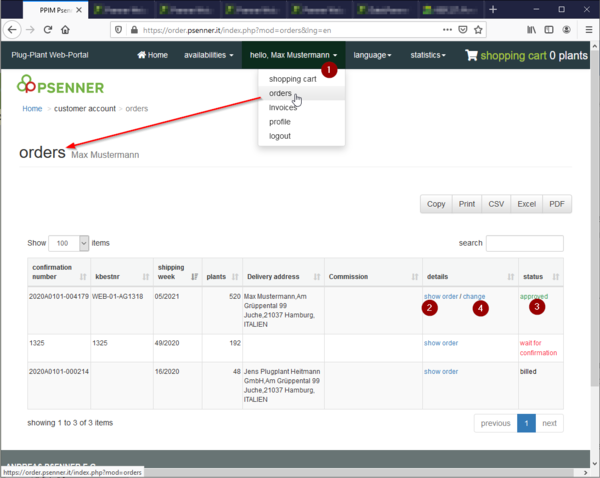
At the log hint (1) you will come to "orders". In this table will be shown the actual orders.
By clicking "show order" (2) you can open the specific order. By clicking at "change" (4) a confirmed order can be changed until start of production (as described below).
In column status (3) you can see the work off at your order:
- - planned on tour
- - approved (you have received a mail)
- - wait for confirmation
- - billed
3.1 show order
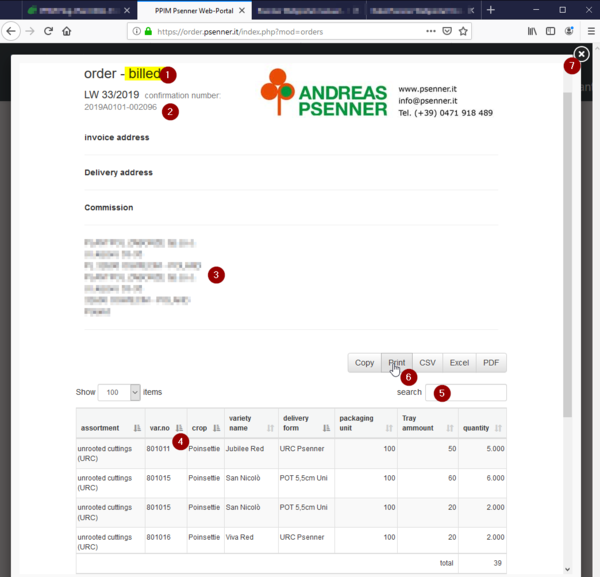
Clicking at "show order" opens a form with all details of the chosen order. The following informations are included:
- - state of the order (1),
- - shipping week and order number (2),
- - addresses of invoice and delivery place (if different) (3).
Surplus this form has some more functions:
- - By clicking the "sort" icon (4) you can sort at different columns,
- - With "Search" (5) you can limit a big order to less positions,
- - the different possibilities to save or export will be explained later,
- - By clicking the "cross" top right (7) you can leave this window again.
3.2 change order
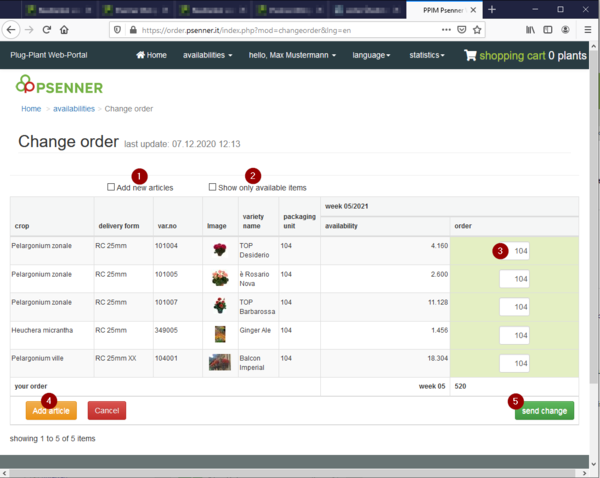
It is possible to change an order if it is in the status approved or planned on tour. By clicking on change a new masque will open where changes in the quantity could be written or surplus articles could be added.
The articles of the order called up will be displayed with their availability and the ordered quantities after clicking on "change".
By hooking Add new articles (1) there will open a list with new introduced articles of this year. Combined with Show only available items (2) this list will be reduced to the articles available in the delivery week.
In the input fields of the quantity (3) the number can be changed.
If the status of this order already is planned on tour the quantity only can be increased. It is possible to reduce or delete an article only before.
By clicking the button >>Add article<< (4) more articles and other assortments can be selected and added to the order.
If a change shall be fixed please click on >>send change<< (5) to confirm and send.
If there shall be no change you have to click the button >>Cancel<< to end this procedure properly.
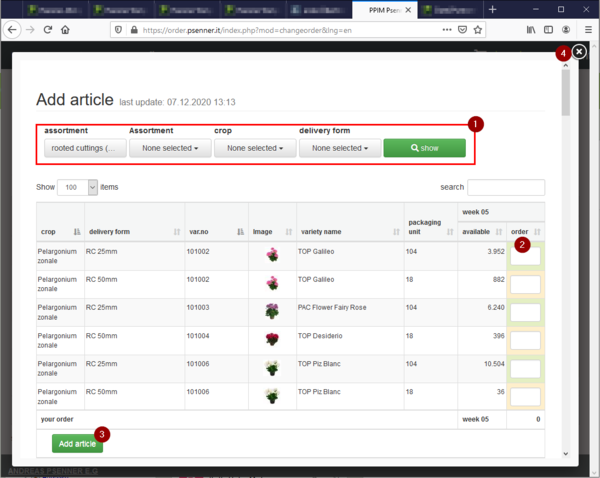
The masque "Add article" is similar to the assortment masque. Again you can first reduce the selection to particular items or groups (1).
In the input fields (2) the required quantity can be written. The entered quantities will be added to the order by clicking the button >>Add article<< (3).
It is possible to leave this masque without any changes by clicking the cross top right (4).
3.3 Renew order
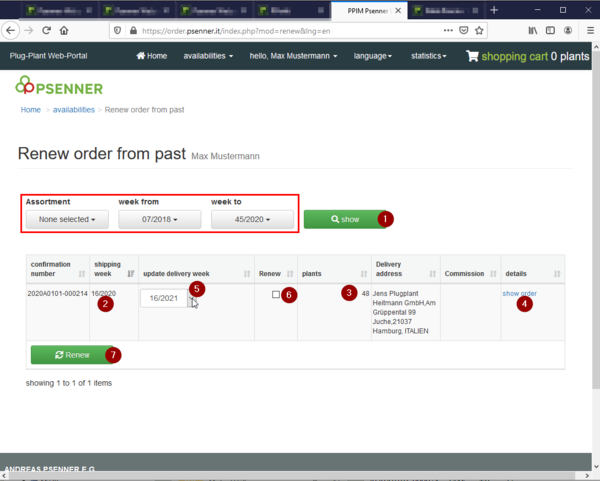
With the selection "Renew order" it is possible to recall orders and order again for the next season.
In the red framed fields the assortment can be chosen and the period can be restricted from a standard period of three years. With a click on >>show order<< (1) the concluded orders of this selection will be displayed. You will find the then-delivery week (2) and then-total quantity (3).
In the details (4) the order can be displayed (see above).
In the selection field Update delivery week (5) the new delivery week can be postponed to or fro for two weeks. If this order shall be used for the next season it has to be hooked at Renew (6).
The orders selected this way can be called up again with clicking on >>Renew<< (7).
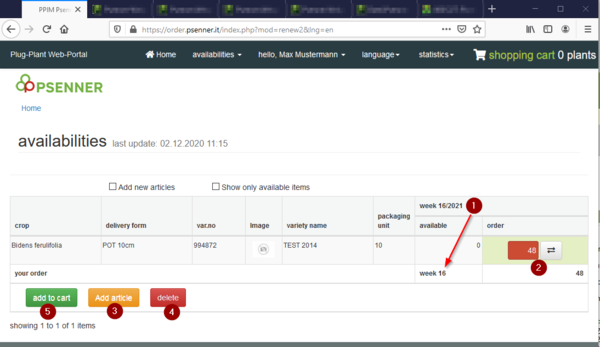
Now each article will be displayed for the selected week (1) and the then-ordered quantity (2).
Here again colours of availability are relevant. The red marked article actually is not available for this period.
With the button >>Add article<< (3) you enter the masque "assortment" again and can select surplus articles.
At >>delete<< (4) the new order will be cancelled. You can start again after doing so.
If an existing order is displayed in "Renew order" at the beginning, please first click the button >>delete<< (4)! An ordering process of before has not been finished.
With >>add to cart<< (5) the selected articles will be taken to the shopping cart.
4 Invoices
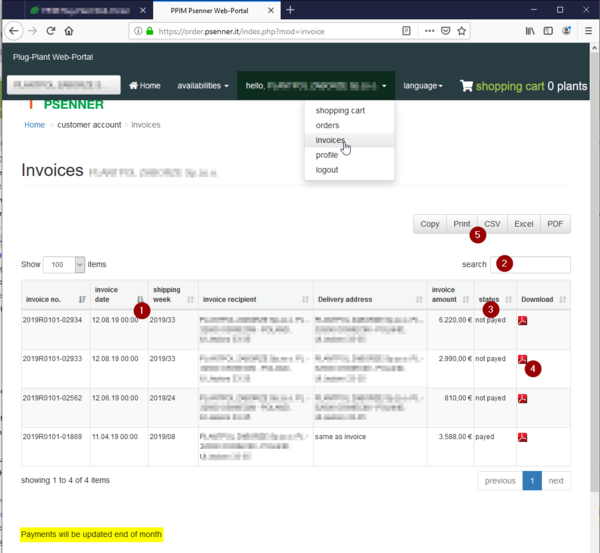
With selecting "Invoices" your invoices will be shown in a table.
Again in this table you can sort by invoice number or date (1), use the search (2) or export (5) this table.
In column "status" (3) you will find out if the respective invoice is payed already or is open or if the payment date is exceeded already (not payed).
If you cannot find an invoice in your documents you can download it with clicking the pdf-logo (4) and save it.
5 Statistics
5.1 Statistics in the customers login
In "Statistics" different requests could be done and taken for further decisions. Selecting the title (1) takes you to the corresponding screen.
All statistics can be created in different formats or exported to Excel.
5.1.1 orders per customer
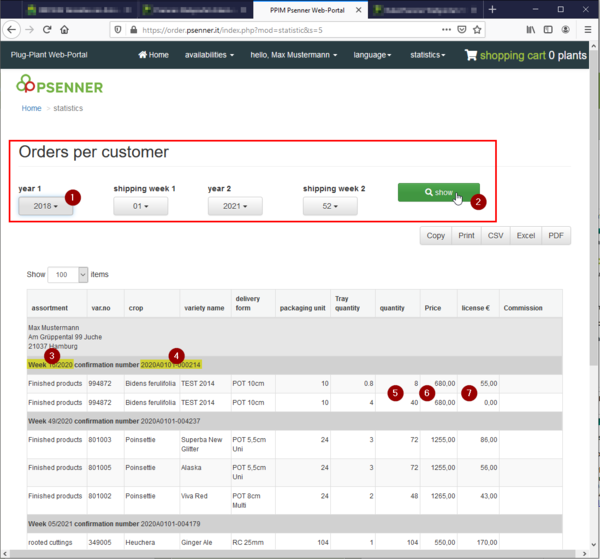
In "orders per customer" only the framed fields will be shown first. A selection up to three years back (year 1) and to the following year (year 2) will be possible. It can be set via the lookup-fields (1). After clicking on >>Show<< (2) the orders will be displayed.
In the headline of each order you will find delivery week (3) and order number (4).
In each information you will find article specification as well as quantity (5), price (6) and a possible license fee (7).
With this statistic, our agent can quickly print out the orders of clients he wants to visit next week.
5.1.2 order statistics
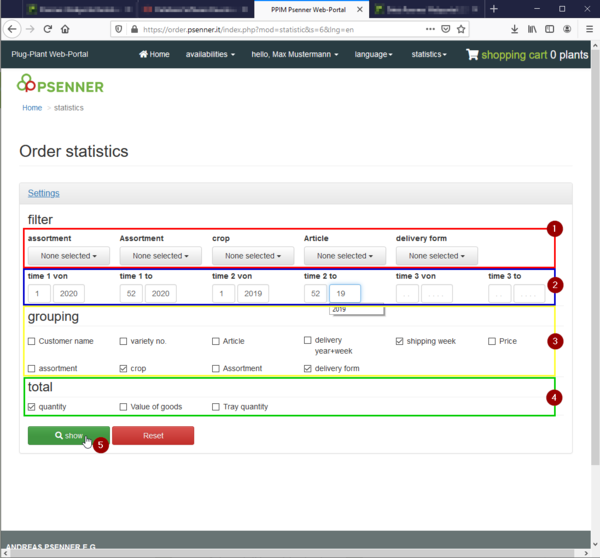
In the "order statistics" you can first set the same filters as in the order masque (1) in order to have a pre-selection.
Then the time space can be reduced to one or more periods(2).
If there are selected several time periods, the parameters selected in "total" will be displayed as account1, account2.
In "grouping" (3) you can chose several groupings according to your needs.
- chose
delivery year+weekif you select a period lasting longer than one year.- Example: time1 from 1/19 to 52/20
- the result will be a separate line for each year
- chose
shipping weekif you entered more than one period.- Example: time1 from 1/19 to 52/19, time2 from 1/20 to 52/20
- the week will be set in both columns.
Selection in "total" (4) will be displayed as a result column for the selected periods.
By clicking >>show<< (5) the corresponding chart will be displayed.
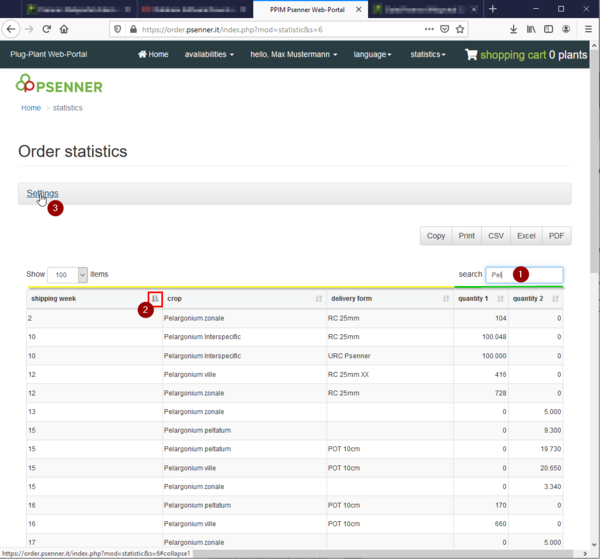
In the called up statistic, the selected groupings (marked in yellow) will be displayed first, then the fields of the totals in the selected periods (green).
In the result, you can additionally search for certain articles (1). Furthermore, you can assort the columns in the sequence you prefer by clicking the sort icon (2).
You will come back to the selection masque by clicking on "Settings" (3) .
5.2 Statistics in the agency login
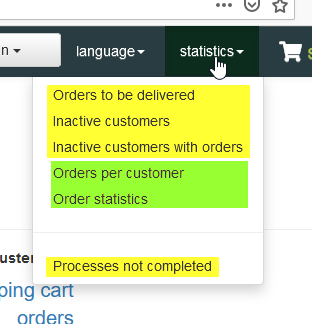
Salesmen who are logged in as agents, in addition to the described above statistics (marked in green here) can call up further overviews which will be described as follows.
All statistics can be printed directly for a paper use at the visit or saved as PDF or for Excel export.
5.2.1 Orders to be delivered
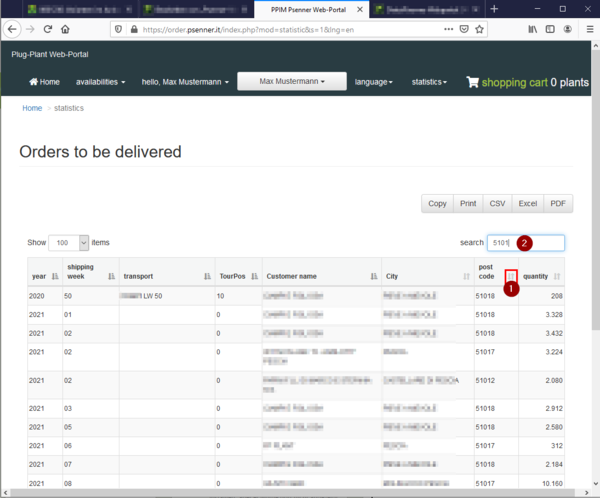
You can call orders set to be delivered via "orders to be delivered".
A pre selection can be done by sorting for delivery week or postcode (1) or directly in the search field by reducing the postcode to a region (2).
This way clients could be contacted afterwards to ask if they are satisfied. Doing so, you may possibly get a surplus order.
5.2.2 Inactive customers
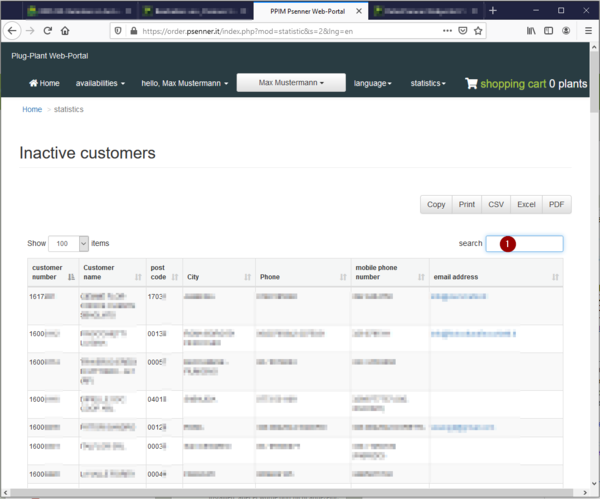
Through the statistic "Inactive customers" you can start a pointing search for contact details of customers who did not order for a longer period.
The search field (1) could be a helpful tool therefor.
5.2.3 Inactive customers with orders
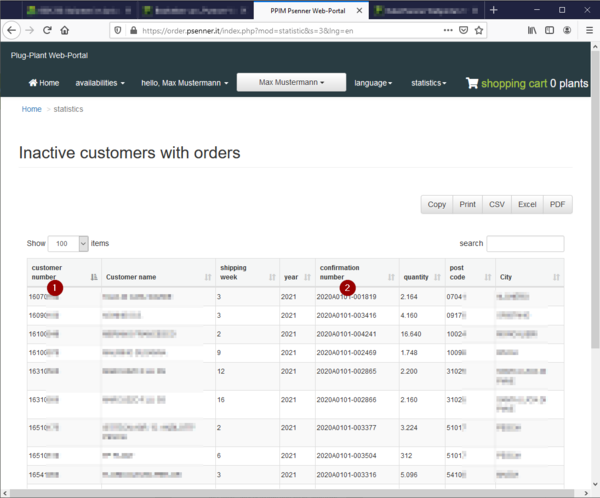
Sometimes it happens that a customer is set inactive, although there is an open order. In this statistic you can check if the order possibly has to be cancelled. Potentially the customer has to be set active again.
You get all relevant information from displayed customer number (1) and confirmation number (2).
5.2.4 processes not completed
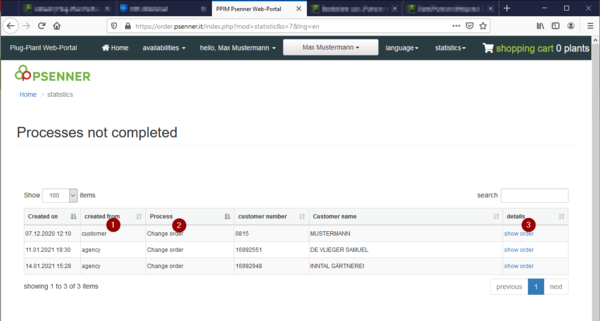
Using "processes not completed" helps to reduce data waste. In column "Erstellt von" (1) you will find out if the customer himself or the responsible agent did not complete the order.
In "process" (2) you can see that the customer thought to change an existing order. At the end he decided against it but did not cancel this action correctly.
In "details" it is possible to open this process again with show order (3).
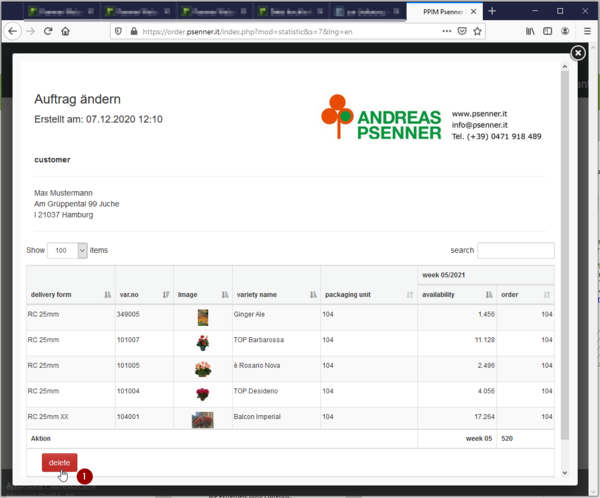
If more than one day has passed, this process cannot be continued. To end it, you can only click on >>delete<< (1).
6 Profile
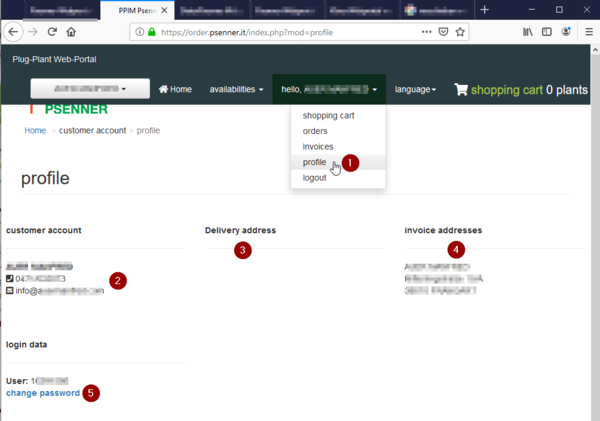
With the selction "profile" (1) you find your customer data deposited at Psenner. Please check if phone number and mail address (2) are alright and shipping address (3) as well as invoice address (4) are correkt.
Below the "login data" your user number is shown. Clicking "change password" (5) will open another window where you could deposit a new password for your login.
6.1 change password
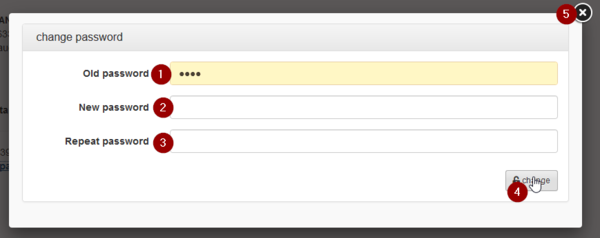
If you want to change your password first put in your old password (1).
In the second line you put in your new password (2) and confirm by putting in the third line again (3). They will be checked for matching.
To confirm your new password now please click the button >>change<< (4).
If you want to leave this window without changing the password please click the cross top right (5).
7 Exporting the data files
Below the menu-buttons on the right you find different possibilities to export your data files.
7.1 as PDF
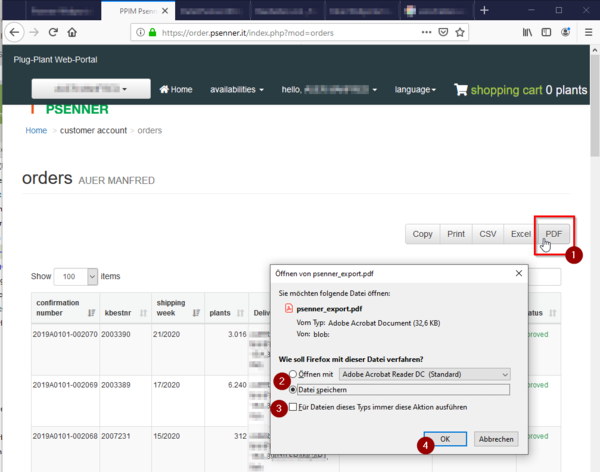
The >>PDF<< button (1) opens a popup-window to transfer the actual table into a PDF file.
You can choose (2) between "save directly" or open in Adobe Reader first to have a look on the dates and then save with another name.
Surplus you can set a hook to choose this way for every PDF file (3).
To finish you click >>OK<< (4).
7.2 in Excel
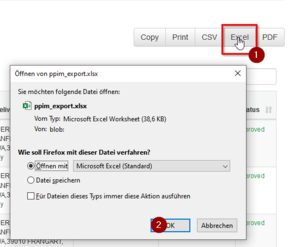
With the >>Excel<< button (1) a similar window like for the PDF one opens. When you confirm with >>OK<< (2), an Excel file opens where all dates are transfered in.
You have to give the files free to edit the dates.
7.3 Copy
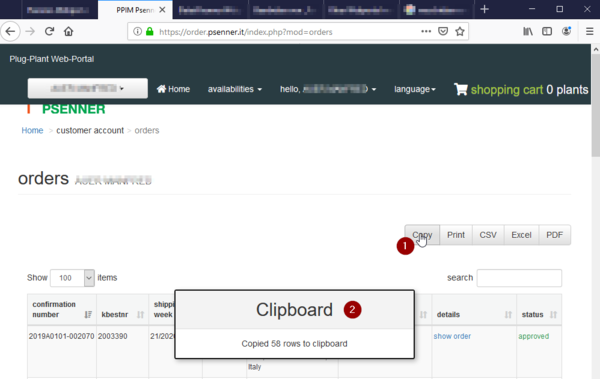
The button >>copy<< (1) corresponds to the Windows-command Strg + C without marking the lines in advance.
For a short moment you will see the note "Clipboard" (2).
As well in table calculation software as in text software you now can use the command "Insert" – e.g. Strg + V – or "right mouse button" and "insert" to insert the clipboard dates.
